Epiphany Star
Art Project During Advent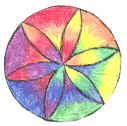
Martha writes, As an art teacher at a Christian school, I have used this lesson every year for the 3rd grade classes. It may be modified and simplified for other grades and for Sunday School.
Instructional Objectives: The student will learn about the Christian celebration of Epiphany. The students will learn how to use a compass to draw a circle, how to make a six pointed star or flower using a compass, and discover what happens to crayon on paper when it's oiled.
Materials and Equipment: Sharp pencil, compass, practice paper, 8-9 inch square of 50 LB paper, crayons, scissors, oil (mineral or baby works well), piece of cotton ball for oiling, paper towels.
Biblical Application: To allow the students the opportunity to express their God given talents.
Preparation: Have the book "The Legend of Old Befana" by Tomie De Paola available. Have a sample Epiphany Star prepared, cut paper, sharpen pencils.
Show the book to the class and talk to them about legends. What are they? (An old story that is not true but may be based on a true event.) Read the book to the class. After you read the book, talk about the Christian festival of Epiphany. Tell the class how in some countries especially in Europe, children do not get Christmas presents until Epiphany. This is also a good time to talk about the truths about the visit of the Magi, explaining how it was not at the manger, and Jesus was probably between the ages of 2-5. Go back to the book and show the stars. Tell the students that they are going to make stars like those in the book.
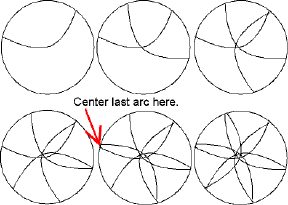
Art Production: Explain the compass and how it works. Have the students make a 6 inch circle on their practice paper. (See illustration below) Go around the room and make sure all the students can make a reasonable circle. Move to the good piece of paper. Placing the center of the compass in the middle of the paper, have the students make a circle that fills most of the page (usually 5-7 inch diameter works well). Make sure that the students know what setting they used to make the circle, as they will have to make more the same size. Now set the center point of the compass on the edge of the circle and make an arc that touches the sides of the circle. Move the center point of the compass to one side of where the arc touches the circle and make another arc. Continue this procedure around the circle until the "flower" is finished. Many students have trouble with where to place the compass for the last arc. Once the "star" is drawn, have the students color it with crayon, coloring very darkly. If they wish to have it look more like stained glass, they may go over the lines with black when they are finished coloring. If they are to put their names on the stars, it must be in pencil on the back. To make them "transparent" have the student turn the star over and rub the back with oil until completely covered. Place in-between two pieces of paper towel to blot.
Copyright 2003 Martha Donley
llamamama@your-net.com
Return to the Christian Crafts page.
You can make a
difference!
Your purchases
and donations to the site help to distribute
our children's ministry resources to churches across the world.
Subscribe to our Newsletter - Learn More